13 npm Tricks for Faster JavaScript Development
Speed up your JavaScript workflow with npm and package.json

Published on
Jun 21, 2019
Read time
8 min read
Introduction
Every day, thousands (maybe millions) of developers reach for npm (or Yarn) for their JavaScript projects. Running commands like npm init or npx create-react-app has become the go-to way to begin almost any JavaScript project, whether you’re building code for the client-side or server-side — or even if you’re building a desktop app.
But there’s a lot more to npm than initialising projects or installing packages. In this article, we’ll discuss 13 tricks to get the most out of npm: from simple shortcuts to custom npm init scripts.
Since many of us use npm every day, even saving a small amount of time could make a significant difference in the long run. These tricks are aimed at beginner and intermediate developers, but even if you’re an experienced developer, I hope you still find one or two features that you hadn’t encountered before.
Finally, if you’re completely new to npm, it comes bundled with Node.js, which you can install at https://nodejs.org/en/. If you’re on Windows, I recommend installing Git Bash to follow along. Let’s dive in.
1. Learn the Essential Shortcuts
We’ll start with the basics. A short time spent learning the most common npm shortcuts will mean time-saved in the long run.
- Installing — Regular:
npm install. Shortcut:npm i. - Testing— Regular:
npm test. Shortcut:npm t. - Getting Help— Regular:
npm --help. Shortcut:npm -h. - The Global Flag — Regular:
--global. Shortcut-g. - Saving as a Development Dependency — Regular:
--save-dev. Shortcut:-D. - Accepting npm init Defaults — Regular:
npm init --yesornpm init --force. Shortcut:npm init -yornpm init -f.
You no longer need to use --save or -S to save packages, as that is now the default. To install a package without saving it, use the --no-save flag.
Less Common Shortcuts
There are also a handful of less common shortcuts, including:
- Saving as an Optional Dependency — Regular:
--save-optional. Shortcut:-O. - Saving an Exact Version of a Package — Regular:
--save-exact. Shortcut:-E.
If you ever need to preserve an npm package locally or have a selection of packages available through a single file download, you can bundle them together using --save-bundle or -B, and obtain the bundle by using npm pack.
The Root Shortcut
The . symbol is commonly used to represent the root directory of an application or (depending on context) the app’s entry point — in npm terms, that’s whatever’s specified as the value of "main" in package.json:
{
  "main": "index.js"
}
This shortcut can also be used with commands like npx create-react-app. So, instead of creating a new my-app directory with npx create-react-app my-app, you can run npx create-react-app . to set up React in the folder you’re already in.
2. Set Default npm init Properties
When running npm init to begin a new project, you’ll likely find yourself typing out some details again and again. For example, chances are you are the author of most of your projects. To save time, you can set default values for these fields like:
npm config set init.author.name  "Joe Bloggs"
npm config set init.author.email "joebloggs@gmail.com"
npm config set init.author.url   "joebloggs.com"
npm config set init.license      "MIT"
To check that these properties were added correctly, type npm config edit to bring up the configuration file. You can also edit details by typing values directly into this file. If you want to edit global npm setting, use npm config edit -g.
To go back to the default settings, you can use the following script. The first line replaces the config file with an empty string, and the second line re-fills it with the default settings.
echo "" > $(npm config get userconfig)
npm config edit
The above script will reset user defaults, and the following one will reset global defaults:
echo "" > $(npm config get globalconfig)
npm config --global edit
3. Make Scripts Cross-Platform Compatible
Any code that runs on the command line risks compatibility issues, especially between Windows and Unix-based systems (including Mac and Linux). This not be a problem if you — and only you — are working on a particular project, but there are many cases where cross-platform compatibility is key: any open source or collaborative project, as well as example and tutorial projects, should work regardless of the operating system.
Thankfully, the solution is simple. There are a few options, but the one I’ve had best results with is cross-env. Install it as a development dependency, using npm i -D cross-env. Then include the keyword cross-env before any environmental variables, like this:
{
  "scripts": {
    "build": "cross-env NODE_ENV=production webpack --config build/webpack.config.js"
  }
}
I’ve found cross-env to be the most seamless way to achieve cross-platform compatibility, but it may be worth checking out two other popular tools that can help with this:
- rimraf can be installed globally to run cross-platform scripts;
- ShellJS is a portable implementation of Unix shell commands on top of the Node.js API.
4. Run Scripts in Parallel
You can use && to run two or more processes one after the other. But what about running scripts in parallel? To do this, we can choose from a variety of npm packages. concurrently and npm-run-all are the most popular solutions, and in this example, we’ll use concurrently.
First, install it as a development dependency: npm i -D concurrently. Then you can add it to your scripts in the following format:
{
  "start": "concurrently \"command1 arg\" \"command2 arg\""
}
5. Run Scripts in Different Directories
Sometimes, you’ll have an app with multiple package.json files in different folders. It would be convenient to access these scripts from the root directory, rather than navigating to the different folders every time you want to run a script, and there are two ways to do this.
First, you could use cd to access the different folders automatically:
cd folder && npm start && cd ..
But there’s a more elegant solution, which is to use the --prefix flag to specify the path:
npm start --prefix path/to/your/folder
Here’s an example of this solution in a working app, where we want to run npm start in both our front-end (in the ‘client’ directory) and our back-end (in the ‘server’ directory).
"start": "concurrently \"(npm start --prefix client)\" \"(npm start --prefix server)\"",
6. Delay Running Scripts Until a Port is Ready
Often, during the development of a full-stack app, you’ll probably want to start both a server and a client-side presentation layer. The wait-on node module provides a handy way to make sure processes only take place when certain processes are ready: in our case, we a particular port.
For example, here’s a dev script I’m using in an Electron project that uses a React front-end. Using concurrently, the script loads the presentation layer and the Electron window in parallel. But, using wait-on, the Electron window only opens once React’s presentation layer is ready on [http://localhost:3000](http://localhost:3000).
"dev": "concurrently \"cross-env BROWSER=none npm run start\" \"wait-on [http://localhost:3000](http://localhost:3000) && electron .\"",
In addition, React opens a browser window by default, but for Electron development that’s unnecessary. We can disable this behaviour by passing the environmental variable BROWSER=none, preceded by cross-env for cross-platform compatibility.
7. List and Select Available Scripts
Listing the scripts available in a package.json file is easy: just go to the root directory of your project and type npm run in the terminal.
But there’s an even more convenient way to get a list of scripts, which you can run immediately: to do this, install the NTL (npm Task List) module globally:
npm i -g ntl
Then run the ntl command in the project folder. You’ll get a list of available scripts, with the option of selecting one of them to run.
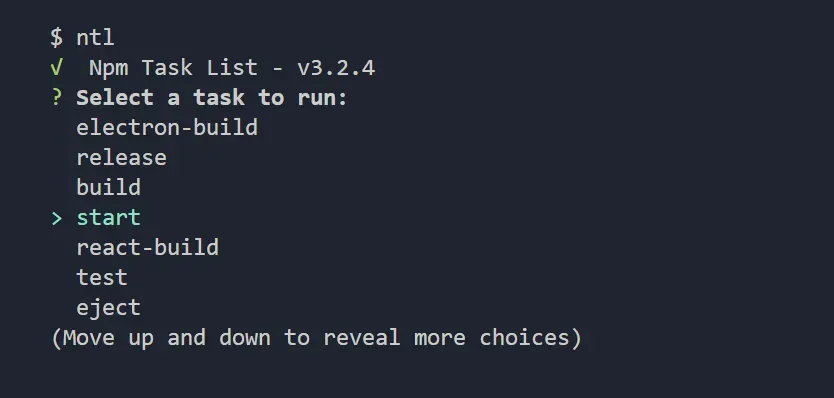
This can be handy if you’re not sure what scripts a project has, or if you’d rather type ntl than a longer script name!
8. Run Pre and Post Scripts
You may be familiar with scripts like prebuild and postbuild, which allow you to define code to run either before or after your build script. But in fact pre and post can be added before any script, including custom ones.
Not only does this make your code cleaner, but it also allows you to run the pre and post scripts in isolation.
9. Control Your App’s Version
Rather than manually changing your app’s version, npm comes with some useful shortcuts to do exactly that. To increase the version, type npm version plus major, minor or patch:
# 1.0.0
npm version patch
# 1.0.1
npm version minor
# 1.1.0
npm version major
# 2.0.0
Depending on how regularly you update your app, you could save time by increase the version number every time you deploy, using a script such as:
{
  "predeploy": "npm version patch"
}
10. Edit package.json from the Command Line
The package.json is a regular json file, so it can be edited from the command line using the tool [json](http://trentm.com/json). This opens up new possibilities when it comes to modifying package.json, allowing you to create shortcuts beyond the defaults. Install it globally:
npm install -g json
Then you can use it for in-place editing with -I. For example, to add a new script “foo” with the value “bar”, type:
json -I -f package.json -e 'this.scripts.foo="bar"'
For a more practical example of the json module in action, see the next tip!
11. Set and Open Your Repository Automatically
If you have a "repository" entry in your package.json file, you can open it in your default browser by typing npm repo.
If your project is already connected to a remote repository and you’ve got a git installed on the command line, you can find out your repository with this command:
git config --get remote.origin.url
Even better, if you followed the tip above and installed the json node module, you can use the following script to automatically add in the correct repository to package.json:
json -I -f package.json -e "this.repository=\"$(git config --get remote.origin.url)\""
12. Create a Custom npm init Script
Let’s take it a step further, with our own npm init script that takes a GitHub repository URL and automatically pushes our first commit. In this tip, we’ll discuss how to create a custom npm init script. In the next (and final) tip, we’ll incorporate git.
You can edit the npm init script by redirecting is to a .npm-init.js file in your home directory. (On Windows, that’s usually c/Users/username, and on Mac, it’s /Users/username ).
Let’s begin by creating a .npm-init.js file in our home directory. To make sure that npm init is directed to the correct file, you can run:
npm config set init-module ~\.npm-init.js
Before integrating git, here’s a simple .npm-init.js file that mimics the questions of the default npm init:
module.exports = {
  name: prompt("package name", basename || package.name),
  version: prompt("version", "0.0.0"),
  decription: prompt("description", ""),
  main: prompt("entry point", "index.js"),
  repository: prompt("git repository", ""),
  keywords: prompt(function (s) {
    return s.split(/\s+/);
  }),
  author: prompt("author", "Joe Bloggs joe.bloggs@gmail.com (joebloggs.com)"),
  license: prompt("license", "ISC"),
};
Each question follows the pattern nameInPackage: prompt('nameInPrompt', 'defaultValue'). To set a value by default without the question, simply remove the prompt method.
If you want to return to the default settings, simply delete .npm-init.js.
13. Push Your First Commit to GitHub with a Custom npm init Script
In order to incorporate git commands into our .npm-init.js file, we’ll need a way to control the command line. To do this, we can use the child_process module. We’ll require it at the top of our file and, as we only need the execSync function, we can grab that by itself using destructuring assignment syntax:
const { execSync } = require("child_process");
I also created a helper function, which prints the results of our function to the console:
function run(func) {
  console.log(execSync(func).toString());
}
Finally, we’ll make a prompt for a GitHub repository URL, and — if provided — we’ll generate a README.md file and push our first commit. This should be one of the items in our module.exports object:
repository: prompt("github repository url", "", function (url) {
  if (url) {
    run("touch README.md");
    run("git init");
    run("git add README.md");
    run('git commit -m "first commit"');
    run(`git remote add origin ${url}`);
    run("git push -u origin master");
  }
  return url;
});
Altogether, our .npm-init.js file should look something like this:
And that will give us a package.json file with the following fields:
You could take this even further by incorporating the GitHub API, so that you don’t even have to create a new repository — but I’ll leave that bit up to you!
Overall, I hope this article has opened your eyes to what can be achieved with npm, and demonstrated some of the ways in which you can boost your productivity — whether by making sure you know common shortcuts, by getting the most out of the scripts in package.json, or by coding a custom version of npm init.
If you have any questions, check out the official npm docs for more information. Thanks for reading!
Related articles
You might also enjoy...

How to Easily Support ESM and CJS in Your TypeScript Library
A simple example that works for standalone npm libraries and monorepos
5 min read
May 2024
How to Publish Your First npm Package
Everything You Need to Know to Create a Useful npm Package
8 min read
Aug 2019
Switching to a New Data Structure with Zero Downtime
A Practical Guide to Schema Migrations using TypeScript and MongoDB
7 min read
Feb 2025