Using TypeScript with MongoDB
Combine the power of TypeScript and MongoDB to create a scalable, production-grade database

Published on
Apr 14, 2020
Read time
8 min read
Introduction
MongoDB is a versatile NoSQL database, commonly paired with Node.js. Instead of tables and rows, it uses collections and documents to store data. But what makes it so versatile — the fact that no schema is required — can also make it more difficult to scale and maintain, particularly in a large, production-grade application.
This is where tools like Mongoose and TypeScript come in handy. While many MongoDB tutorials cover Mongoose, far fewer discuss how to introduce TypeScript into your MongoDB projects. That’s why I’m writing this article. In it, we’ll discuss ways to combine MongoDB with TypeScript, bringing the advantages of type-checking to our database.
The tutorial is not an introduction to either MongoDB or TypeScript, but rather provides a strategy for using them together. For those who want to skip straight to the finished code, there’s a repo link at the bottom!
1. Setting Up MongoDB
This article assumes you know how to install MongoDB, create a database and connect to it. If you’re unsure about that or need a quick refresher, check out my article MongoDB: A Beginner’s Guide, which covers setting up a database in the cloud using MongoDB Atlas.
You’ll need to grab your database’s connection URI to continue with this article. This can be copied from the MongoDB Atlas, and it should look something like this:
mongodb+srv://username:password@cluster0-v6q0g.mongodb.net/test?retryWrites=true&w=majority
Make sure to replace username and password with your own credentials.
Running MongoDB Locally
For simplicity, I recommend using the cloud version of MongoDB. But if you’d prefer to run MongoDB locally, you’ll need to make sure you have MongoDB installed and (probably) MongoDB Compass — a GUI for the database. Before proceeding with the tutorial, run mongod in the terminal. By default, your connection URI will be mongodb://localhost:27017/test. If you need something other than the default, check out the official reference.
Note: If you’re on macOS Catalina, you may have to go through some additional steps to get up-and-running locally for the first time. I wrote an article about this here.
2. Setting Up Your Project
We’ll begin by initialising the project, by typing yarn init (or npm init ) into the terminal. When prompted, set the entry point to src/server.ts.
Next, we’ll install our dependencies, using yarn add (or npm install ):
## dependencies
yarn add express mongoose## devDependencies
yarn add -D nodemon typescript ts-node @types/express @types/mongoose @types/node## globalDependencies
npm i -g typescript ts-node
We’ll be using Express to make our server and Mongoose to create our MongoDB schema and connect to MongoDB. Nodemon speeds up development, by automatically restarting the node application when a file changes. TypeScript allows us to create TypeScript files, and ts-node allows us to execute those files in Node. Finally, we need to add in types for Express, Mongoose and Node.
3. Configurations
Before we can get coding, we need to create a development script in package.json. I suggest using:
"main": "src/server.ts",
"scripts": {
  "start": "node --inspect=5858 -r ts-node/register ./src/server.ts",
  "dev": "nodemon",
  "build": "tsc",
  "script": "cd src/scripts && ts-node"
}
Above, I updated "main" to src/server.ts.
I also added a script called "script", which we’ll use to trigger dev scripts later in the tutorial.
We can configure the TypeScript compiler by creating a tsconfig.json file in the root directory. This will tell the compiler where to look for TypeScript files and it will allow us to use ES6 import / export syntax. Here’s a configuration to get us started:
{
  "compilerOptions": {
    "target": "es6",
    "module": "commonjs",
    "outDir": "dist",
    "sourceMap": true
  },
  "include": ["src/**/*.ts"],
  "exclude": ["node_modules", ".vscode"]
}
4. Connecting to the Database
It’s time to start writing code!
We’ll start by connecting to our database. It’ll be useful, later on, to create a separate file to initialise our database, which we’ll put inside src/database:
mkdir src && cd src && mkdir database && touch database.ts
In this file, we’ll import Mongoose and create a function to connect to (and another to disconnect from) our database. This is where we’ll use whatever URI we chose in the first section.
import * as Mongoose from "mongoose";
import { UserModel } from "./users/users.model";

let database: Mongoose.Connection;

export const connect = () => {
  // add your own uri below
  const uri =
    "mongodb+srv://<username>:<password>@cluster0-v6q0g.mongodb.net/test?retryWrites=true&w=majority";
  if (database) {
    return;
  }
  Mongoose.connect(uri, {
    useNewUrlParser: true,
    useFindAndModify: true,
    useUnifiedTopology: true,
    useCreateIndex: true,
  });
  database = Mongoose.connection;
  database.once("open", async () => {
    console.log("Connected to database");
  });
  database.on("error", () => {
    console.log("Error connecting to database");
  });
};

export const disconnect = () => {
  if (!database) {
    return;
  }
  Mongoose.disconnect();
};
Now, we can go back into the src folder and create the file that will start our server: server.ts.
mkdir src && cd src && touch server.ts
With the database logic elsewhere, our server can be very simple:
import * as express from "express";
import { connect } from "./database/database";

const app = express();
const port = 5002;

connect();

app.listen(port, () => {
  console.log(`Server started on http://localhost:${port}`);
});
5. Creating Models
This is where we can begin to benefit from TypeScript. There are lots of different possibilities when it comes to structuring your app. But, as there are usually three parts to a Mongoose model (schema, static methods and instance methods), I recommend splitting these into three separate files. We can add a fourth file to hold our TypeScript interfaces and a fifth to bring everything together.
So, let’s create a folder inside src called database/users and — in the users directory — create the five files:
users.schema.ts— where we define the MongooseSchema, which determines the shape of our MongoDB documentsusers.statics.ts— where we define the static methods of our model, functions which can be called on the model itselfusers.methods.ts— where we define the instance methods of our model, functions which can be called on individual model instancesusers.types.ts— where we store the types we’ll use in the other filesusers.model.ts— where we’ll bring everything together.
Here’s a shell command to create those files:
cd src && mkdir database && cd database && mkdir users && cd users && touch users.schema.ts users.statics.ts users.methods.ts users.types.ts users.model.ts
users.schema.ts
We’ll start with the schema and give our user document five fields:
import { Schema } from "mongoose";

const UserSchema = new Schema({
  firstName: String,
  lastName: String,
  age: Number,
  dateOfEntry: {
    type: Date,
    default: new Date(),
  },
  lastUpdated: {
    type: Date,
    default: new Date(),
  },
});

export default UserSchema;
So far, this is all Mongoose. Now let’s create a TypeScript interface to represent our schema.
users.types.ts
In this file, we’ll define an interface containing the same fields as the schema. We’ll also want to extend this as part of two more interfaces:
IUserDocument— which includes our fields, plus the other elements of a standard MongooseDocumentIUserModel— which represents a standard MongooseModel, containing documents of ourIUserDocumenttype.
import { Document, Model } from "mongoose";

export interface IUser {
  firstName: string;
  lastName: string;
  age: number;
  dateOfEntry?: Date;
  lastUpdated?: Date;
}

export interface IUserDocument extends IUser, Document {}
export interface IUserModel extends Model<IUserDocument> {}
Later, we can add methods to the IUserDocument and IUserModel interfaces.
users.model.ts
Before adding any methods, let’s combine the schema and types we’ve created so far.
import { model } from "mongoose";
import { IUserDocument } from "./users.types";
import UserSchema from "./users.schema";

export const UserModel = model<IUserDocument>("user", UserSchema);
We now have a working, type-checked Mongoose model!
Now, what if we wanted to add methods to our model?
users.statics.ts
Static methods are executed on the model itself, rather than on particular instances. We can define static methods in their own file, using the model as the first argument, and later pass them into users.schema.ts.
Let’s create two static methods:
findOneOrCreate, which checks to see if an entry exists and — if it doesn’t — creates a new entry.findByAge, which returns an array of users, based on a provided age range.
We’ll also need to import the IUserDocument and IUserModel interfaces we created earlier:
import { IUserDocument, IUserModel } from "./users.types";

export async function findOneOrCreate(userId: string): Promise<IUserDocument> {
  const record = await this.findOne({ userId });
  if (record) {
    return record;
  } else {
    return this.create({ userId });
  }
}

export async function findByAge(
  min?: number,
  max?: number
): Promise<IUserDocument[]> {
  return this.find({ age: { $gte: min || 0, $lte: max || Infinity } });
}
users.methods.ts
Instance methods refer to particular instances of the model. For example, if we had a particular user called Joe Bloggs, we could perform operations based on any of the fields related to his document in the database.
We’ll also create two instance methods:
setLastUpdated— which will update a particular entry’slastUpdatedfield to the current time.sameLastName— which will find all entries with the same last name as the document.
import { Document } from "mongoose";
import { IUserDocument } from "./users.types";

export async function setLastUpdated(this: IUserDocument): Promise<void> {
  const now = new Date();
  if (!this.lastUpdated || this.lastUpdated < now) {
    this.lastUpdated = now;
    await this.save();
  }
}

export async function sameLastName(this: IUserDocument): Promise<Document[]> {
  return this.model("user").find({ lastName: this.lastName });
}
users.schema.ts
Now, let’s return to users.schema.ts to add in our new methods:
import { Schema } from "mongoose";
import { findOneOrCreate, findByAge } from "./users.statics";
import { setLastUpdated, sameLastName } from "./users.methods";

const UserSchema = new Schema({
  firstName: String,
  lastName: String,
  age: Number,
  dateOfEntry: {
    type: Date,
    default: new Date(),
  },
  lastUpdated: {
    type: Date,
    default: new Date(),
  },
});

UserSchema.statics.findOneOrCreate = findOneOrCreate;
UserSchema.statics.findByAge = findByAge;
UserSchema.methods.setLastUpdated = setLastUpdated;
UserSchema.methods.sameLastName = sameLastName;

export default UserSchema;
users.types.ts
We also need to type check our new methods inside users.types.ts:
import { Document, Model } from "mongoose";

export interface IUser {
  firstName: string;
  lastName: string;
  age: number;
  dateOfEntry?: Date;
  lastUpdated?: Date;
}

export interface IUserDocument extends IUser, Document {
  setLastUpdated: (this: IUserDocument) => Promise<void>;
  sameLastName: (this: IUserDocument) => Promise<Document[]>;
}

export interface IUserModel extends Model<IUserDocument> {
  findOneOrCreate: ({
    firstName,
    lastName,
    age,
  }: {
    firstName: string;
    lastName: string;
    age: number;
  }) => Promise<IUserDocument>;
  findByAge: (min?: number, max?: number) => Promise<IUserDocument[]>;
}
We now have a working Mongoose model — complete with static and instance methods — and everything is type-checked. This process may add a little time and complexity to the development of our model, but it will be much easier to maintain and debug as we grow our application!
6. Adding Users
That’s pretty much everything we’ll need to get working with our model. But so far, we’ve not yet worked with any data.
Let’s create a script to add some dummy data to our database. We’ll start by making a scripts folder and adding a function called createDummyData.ts.
import { UserModel } from "../database/users/users.model";
import { connect, disconnect } from "../database/database";

(async () => {
  connect();

  const users = [
    { firstName: "Emma", lastName: "Bradley", age: 34 },
    { firstName: "Elise", lastName: "Conner", age: 62 },
    { firstName: "Jack", lastName: "Lawson", age: 20 },
    { firstName: "Oliver", lastName: "Moss", age: 80 },
    { firstName: "Jamie", lastName: "Reid", age: 52 },
    { firstName: "Aidan", lastName: "Bradley", age: 73 },
    { firstName: "Jordan", lastName: "Gallagher", age: 27 },
    { firstName: "Erin", lastName: "Miles", age: 23 },
    { firstName: "William", lastName: "May", age: 39 },
    { firstName: "Ethan", lastName: "Butler", age: 68 },
  ];

  try {
    for (const user of users) {
      await UserModel.create(user);
      console.log(`Created user ${user.firstName} ${user.lastName}`);
    }
    disconnect();
  } catch (e) {
    console.error(e);
  }
})();
Before you run this script, make sure you have ts-node and typescript installed globally:
npm i -g typescript ts-node
Then, we can run yarn script createDummyData to populate our database with a few new users.
If you open up MongoDB Atlas (or MongoDB compass), you should now see a collection called users with 10 new documents!
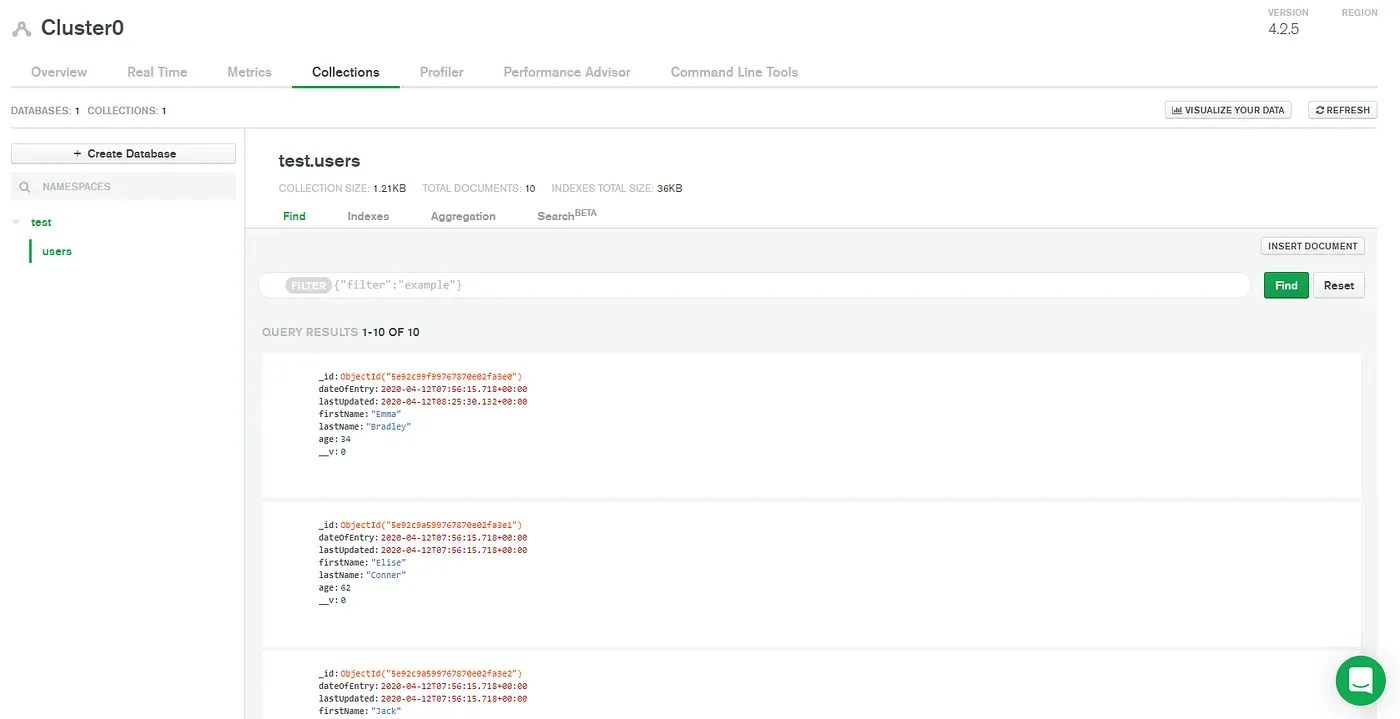
If you’re using MongoDB Atlas, you should see something like this
7. Testing Our Methods
Finally, now that we have some users, we can see our methods in action. To do this, I’ll create another script in our scripts folder, simply called test.ts. Here’s some code which makes use of every static and instance method we created earlier:
import { connect, disconnect } from "../database/database";

(async () => {
  const db = connect();

  // test static methods
  const twenties = await db.UserModel.findByAge(20, 29);
  const newUser = await db.UserModel.findOneOrCreate({
    firstName: "Mike",
    lastName: "Smith",
    age: 57,
  });
  const existingUser = await db.UserModel.findOneOrCreate({
    firstName: "Emma",
    lastName: "Bradley",
    age: 34,
  });
  const numOfUsers = (await db.UserModel.find()).length;
  console.log({ twenties, newUser, existingUser, numOfUsers });

  // test instance methods
  await existingUser.setLastUpdated();
  const siblings = await existingUser.sameLastName();
  console.log({ siblings });

  disconnect();
})();
Run yarn script test and, if everything’s set up correctly, you should see the expected results logged to the console!
I hope this has provided a useful example of how to get the most out of MongoDB and Typescript. To see a working example of the code we’ve created, check out this repo: https://github.com/BretCameron/typescript-mongodb.
Related articles
You might also enjoy...

Switching to a New Data Structure with Zero Downtime
A Practical Guide to Schema Migrations using TypeScript and MongoDB
7 min read
Feb 2025
I Fixed Error Handling in JavaScript
How to steal better strategies from Rust and Go—and enforce them with ESLint
14 min read
Jul 2024
How to Easily Support ESM and CJS in Your TypeScript Library
A simple example that works for standalone npm libraries and monorepos
5 min read
May 2024