MongoDB: A Beginner’s Guide
Learn how to combine the power of Node.js with MongoDB and Mongoose

Published on
Jun 27, 2019
Read time
8 min read
Introduction
In the worlds of JavaScript and Node.js, MongoDB has established itself as the go-to database. It is the ‘M’ in the popular MEAN and MERN stacks, and it is generally considered to be more flexible and easier-to-scale than traditional database technologies like MySQL.
But setting a database for the first time can be tricky. When I first experimented with MongoDB, I encountered several frustrating obstacles that made the process much harder than it should have been. In writing this article, I hope you can avoid my mistakes.
The article is split into four parts. We’ll cover how to:
- Create a cloud database with MongoDB Atlas,
- Connect to it using Node.js and Mongoose,
- Create models for our data using Mongoose,
- Expose API endpoints to perform common database operations.
Even if you’ve never used Node.js or Express before, you should be able to follow along. By the end of the article, you should know the basics of everything necessary to set-up a working MongoDB database.
Part 1: Create a Cloud Database on MongoDB Atlas
MongoDB Atlas is the official cloud database service offered by MongoDB. Though we could set-up an instance of MongoDB locally, getting started with Atlas is much simpler. We’ll be using its free tier.
If you haven’t already, create an account here.
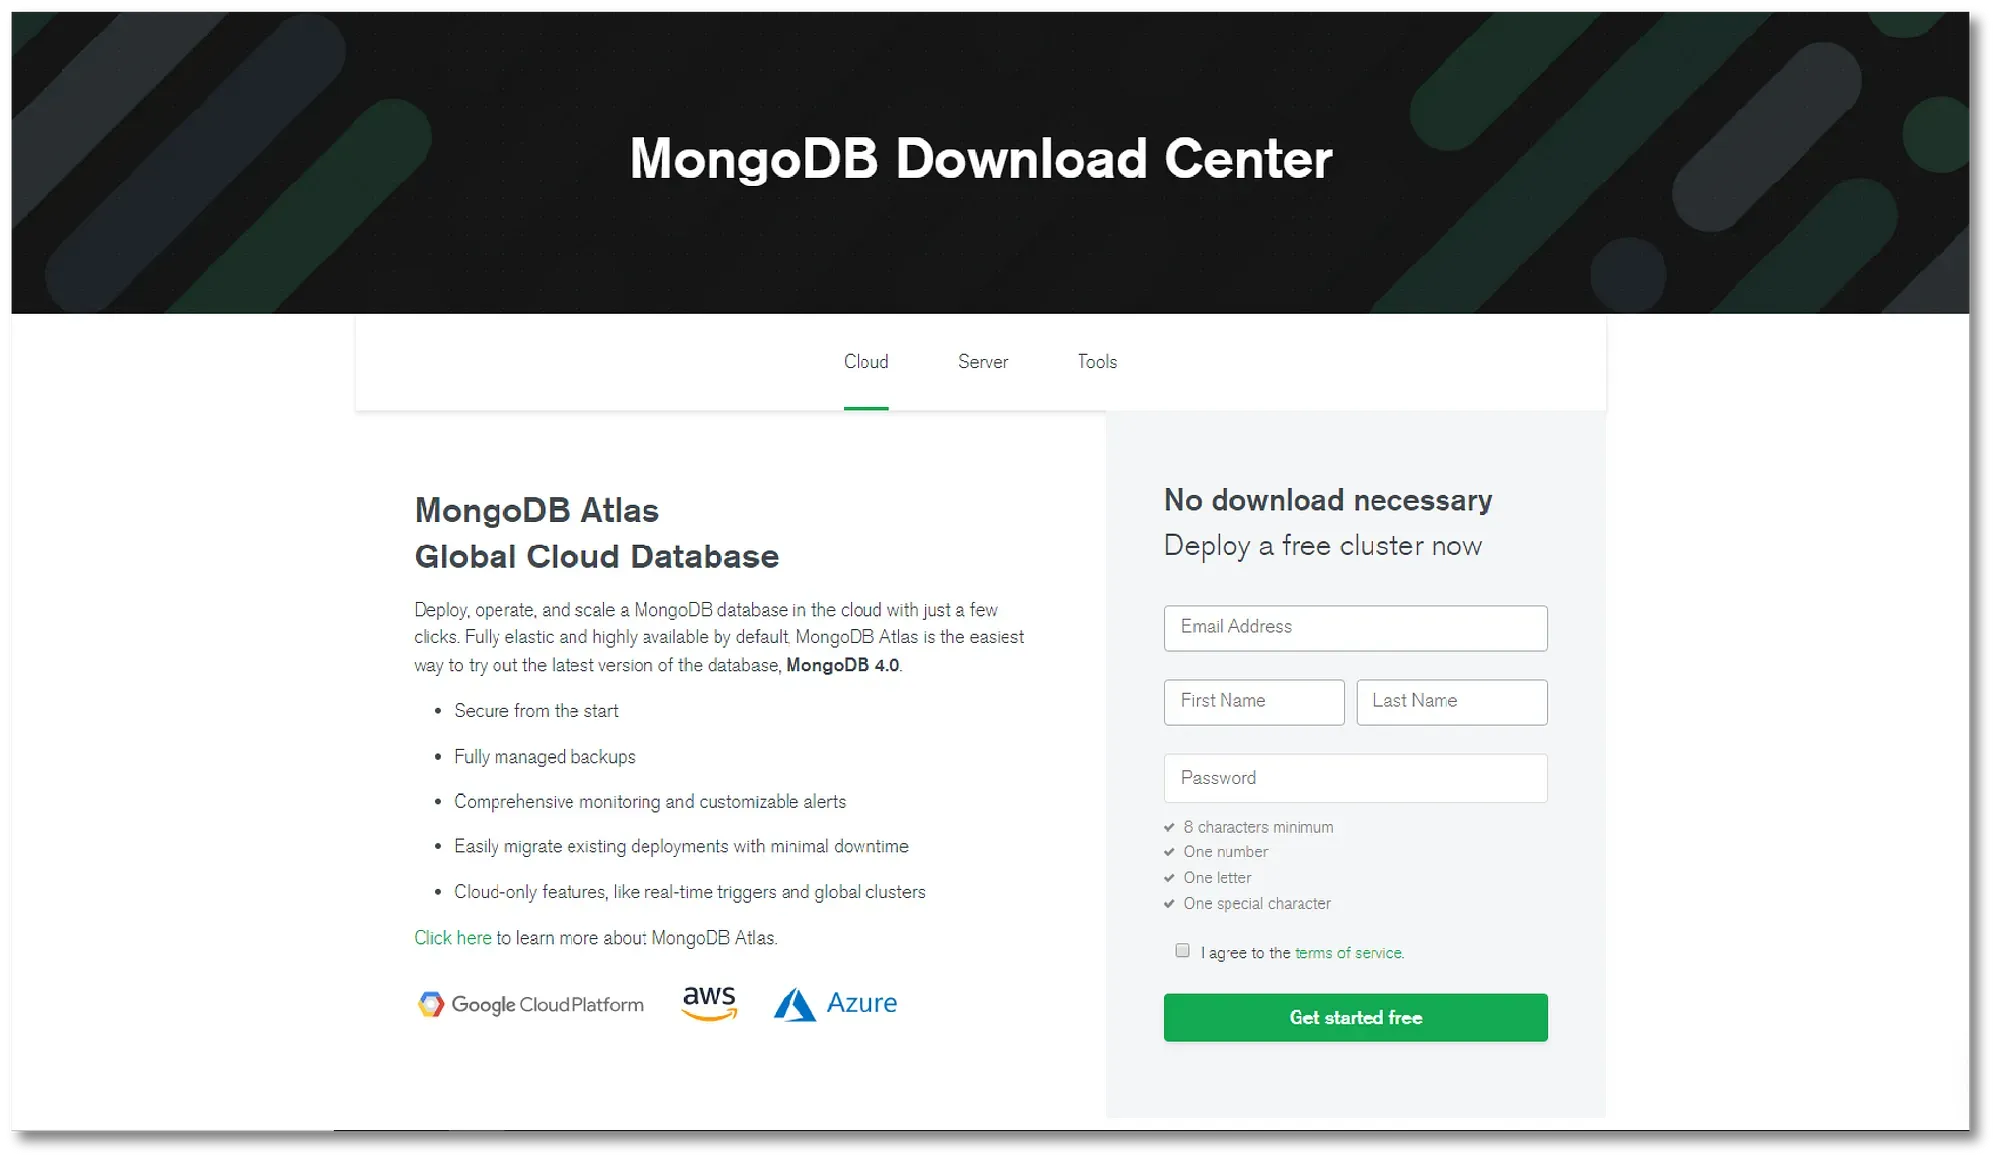
Once you’ve logged in successfully, you should create your first project (feel free to name it whatever you like).
Next, click ‘Build a New Cluster’. You should see a screen like this:
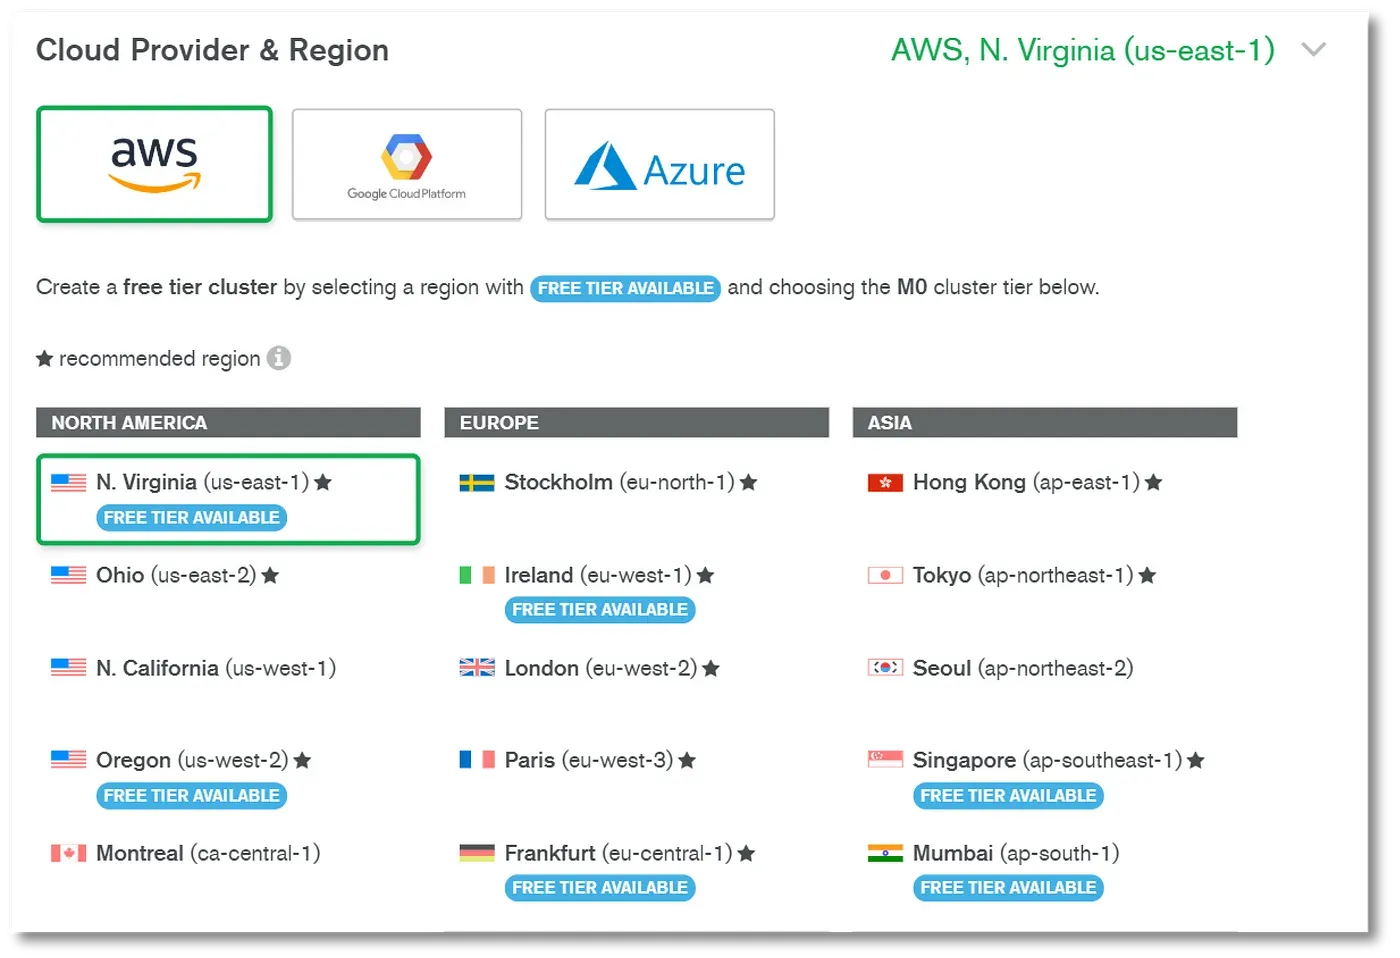
Make sure to choose a region which is labelled ‘Free Tier Available’. Then scroll down and choose the ‘M0 Sandbox’ tier. This is completely free, and you’re allowed one free cluster per account.
In this tutorial, we’ll keep the default cluster name: ‘Cluster0’.
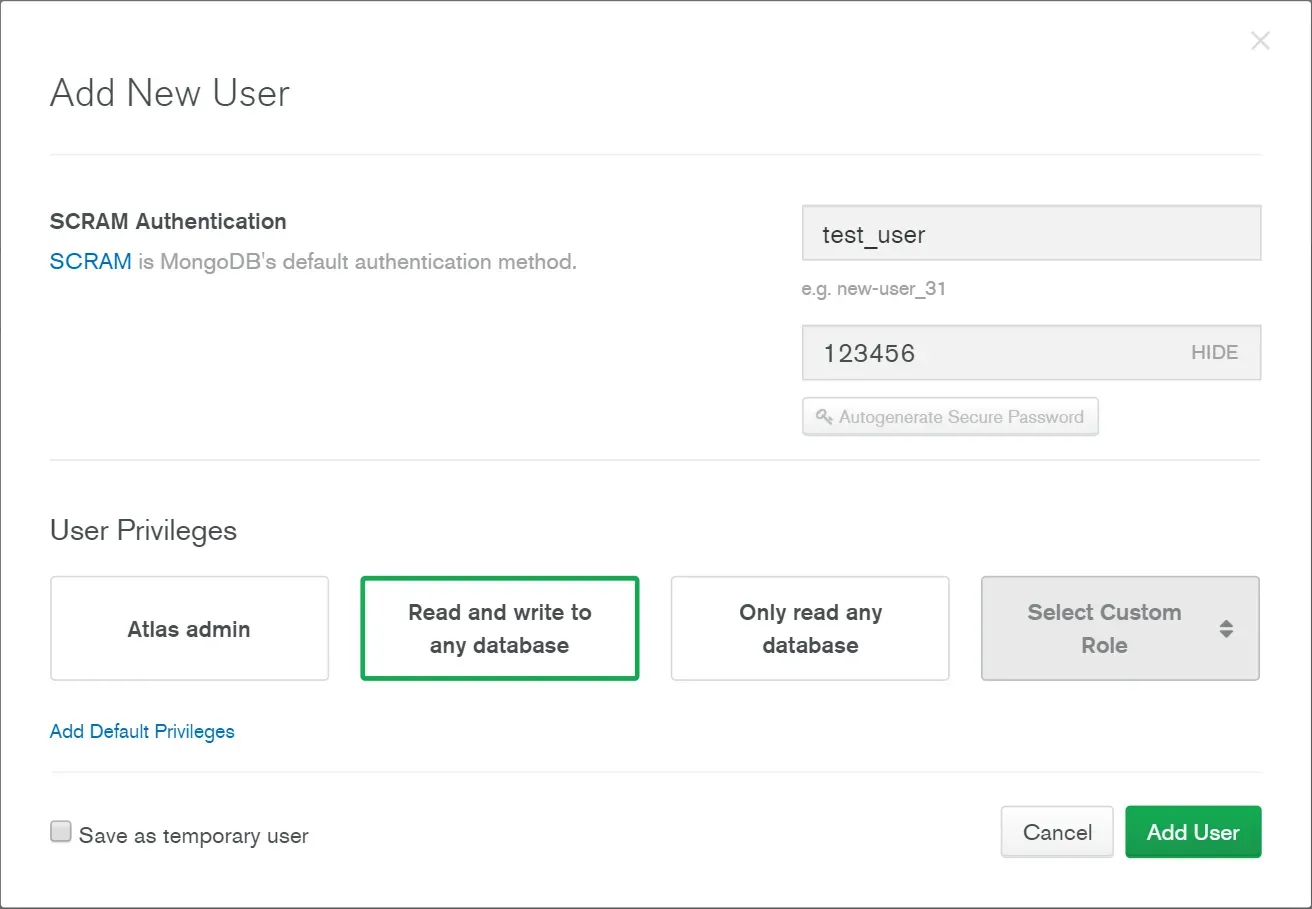
Set User Permissions
We now need to define users and set permissions. In the navigation menu on the left, click ‘Database Access’, then click ‘Add New User’. For this tutorial, we’ll create a user called ‘test_user’ with a password ‘123456’. (For your own projects, I recommend much more secure credentials!)
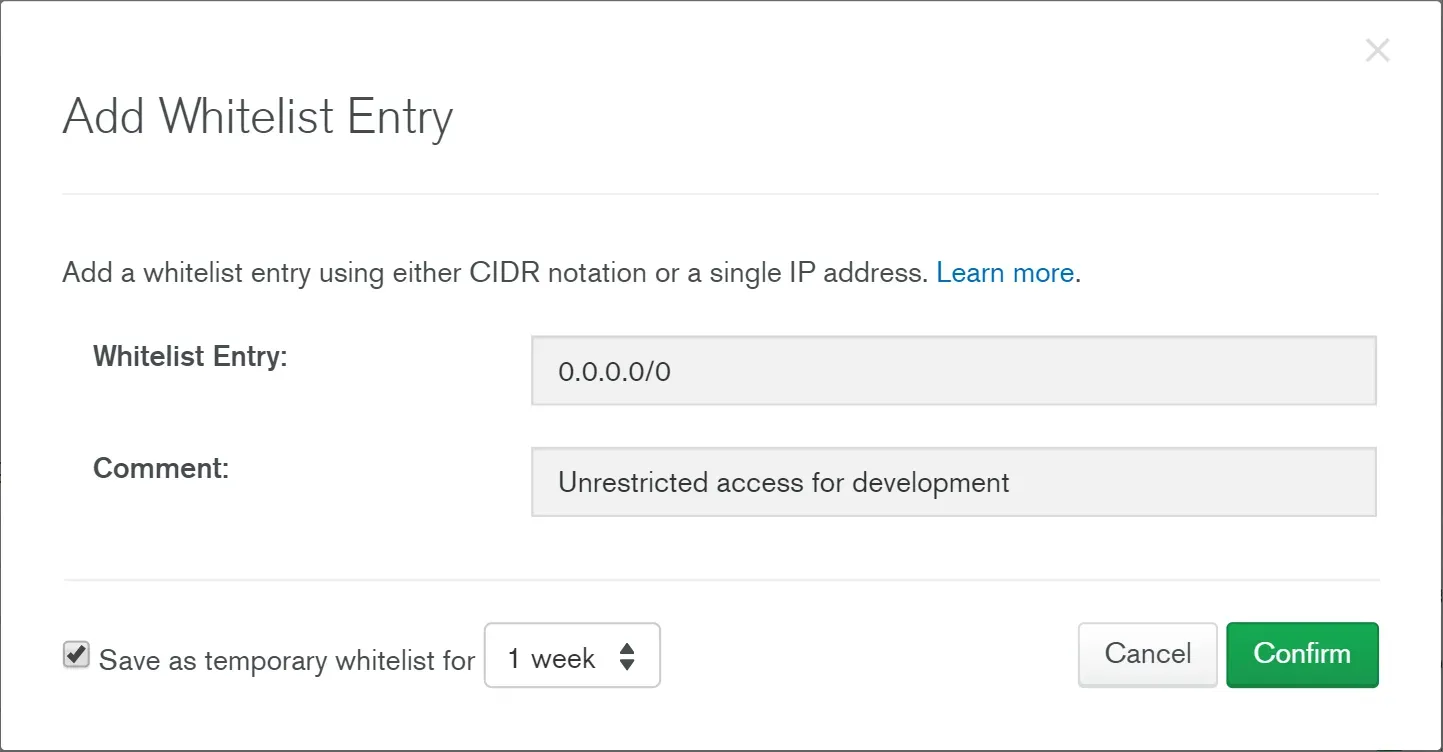
Set Network Permissions
Here is the first obstacle that caused me a lot of issues at the beginning: In order to access your database, you need to whitelist certain IP addresses.
Since I work remotely in lots of different places, my IP address kept changing and so my database wouldn’t connect. It took me far too long to realise that the problem was network permissions!
If you know your IP address will always be the same, just whitelist your own IP. If you move around like me, you can use the 0.0.0.0/0 IP address to allow access from any IP. Since this is less secure, it may be sensible to save this as a temporary whitelist, as in the image below:
Get URI
Finally, go back to the ‘Clusters’ page and, under the name of your cluster, click ‘Connect’.
From the options, choose ‘Connect Your Application’ and you’ll get a connection URI like so:
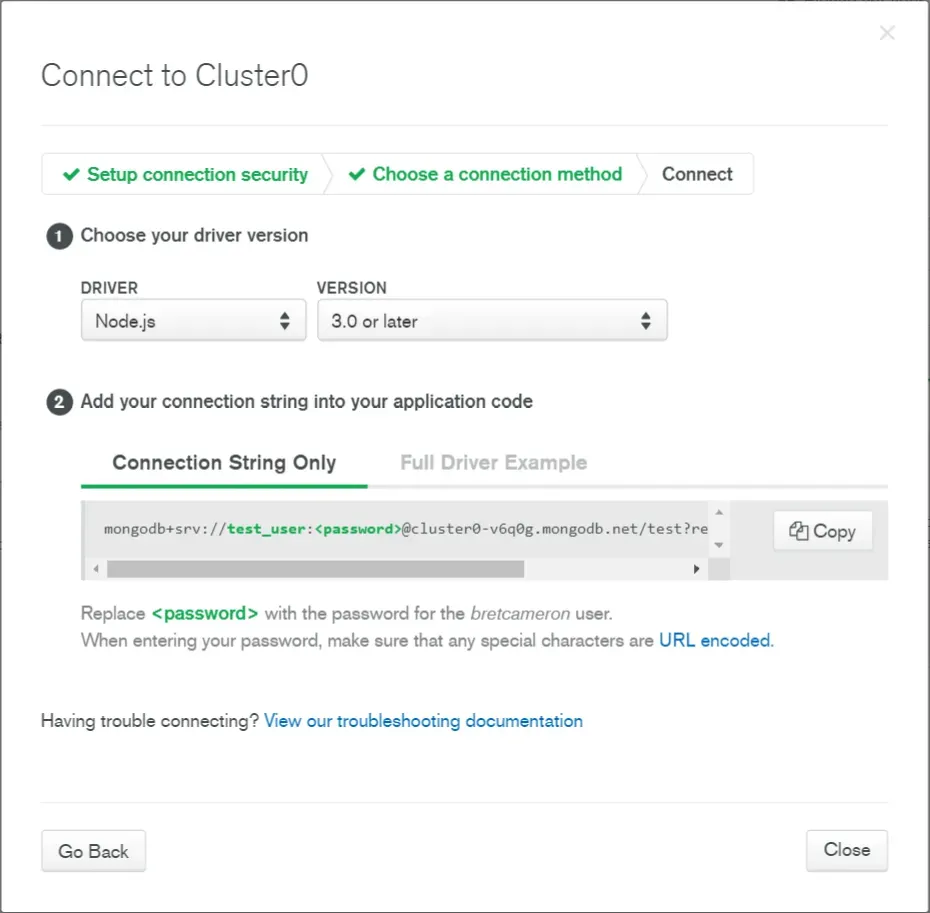
Keep a note of this string. We’re now ready to begin coding!
Part 2: Connect to the Database Using Node.js and Mongoose
Make sure you have Node installed, then open up your terminal, go into a new directory of your choice, and type
npm init
You can accept all the defaults, except for "entry point", which we’ll change to "server.js".
Next, we’ll install all the modules we’ll be using in this tutorial:
npm i express mongoose config
Create a file called server.js in the root directory. We’ll now import our new modules at the top:
const express = require("express");
const mongoose = require("mongoose");
const config = require("config");
const app = express();
Setting Up a Config Directory
We’re using the config module to store our URI for security. That way, we can avoid storing the sensitive data in a git repo and inject the URI during deployment, so that it stays secret!
Create a folder called config in the root directory, and inside it create a file called default.json. This is a JSON object, where we’ll store our URI, like so:
{
  "mongoURI": "mongodb+srv://test_user:123456@cluster0-v6q0g.mongodb.net/test?retryWrites=true&w=majority"
}
(If you plan on committing this project, remember to put the config folder inside your .gitignore file).
Back in server.js we can now import the database using config.get():
const db = config.get("mongoURI");
Connect the Database
The simplest way to connect the database is by using mongoose. It’s connect method returns a promise, so we can use then and catch to let us know whether or not the connection has been successful:
mongoose
  .connect(db, {
    useNewUrlParser: true,
    useCreateIndex: true,
    useFindAndModify: false,
  })
  .then(() => console.log("MongoDB Connected..."))
  .catch((err) => console.log(err));
The arguments useNewURLParser: true, useCreateIndex: true and useFindAndModify: false are necessary to get around several deprecated features in the MongoDB Node.js driver.
As a whole, your server.js file should now look like this:
const express = require("express");
const mongoose = require("mongoose");
const path = require("path");
const config = require("config");

const app = express();

const db = config.get("mongoURI");

mongoose
  .connect(db, {
    useNewUrlParser: true,
    useCreateIndex: true,
    useFindAndModify: false,
  })
  .then(() => console.log("MongoDB Connected..."))
  .catch((err) => console.log(err));
To test the connection, go into the root directory in the terminal and type:
node server
If you’ve followed all the steps correctly, you should see MongoDB Connected...!
Part 3: Create Models for Our Data Using Mongoose
One of MongoDB’s advantages is that it has no schema: there’s no need to set up tables in advance, so you can send data without worrying filling in every field correctly.
But what if you want to define objects with a strongly-typed schema? That’s where Mongoose comes in. Mongoose is popular because it provides an easy way to bring structure to MongoDB and a host of related benefits. In this tutorial, we’ll make an ‘animal’ model for an animal conservation website.
It’s good practice to keep our models in a separate directory. So create a models directory, and in it create a file called Animal.js. To keep things simple, our AnimalSchema will only take three parameters: name, which takes a string; isEndangered, which takes a boolean, and dateOfEntry:
const mongoose = require("mongoose");

const Schema = mongoose.Schema;

const AnimalSchema = new Schema({
  name: {
    type: String,
    required: true,
  },
  isEndangered: {
    type: Boolean,
    default: true,
  },
  dateOfEntry: {
    type: Date,
    default: Date.now(),
  },
});

module.exports = Item = mongoose.model("animal", AnimalSchema);
I’ll now demonstrate how to use Mongoose to easily perform the four most essential database operations: create, read, update and delete.
Create
Back in server.js we can import our model, create a new animal and add it to our database using the save method. For example, we could add the following to the bottom of server.js to save a new entry for a red panda:
const Animal = require("./models/Animal");
const newAnimal = new Animal({
  name: "Red Panda",
  isEndangered: true,
});

newAnimal
  .save()
  .then((item) => console.log(item))
  .catch((err) => console.log(err));
When we type node server into the terminal, we should see a JSON object representing our new item in the console. To see whether it’s been successful, log back into MongoDB Atlas, go to your cluster and click on ‘Collections’: you should see the collection ‘animals’ and, inside it, our new documents.
Try adding a few more items of your own, so we have a handful of documents in our database.
Read
To double check that we added our item correctly, let’s comment out the code used to save a new document. Now, let’s read every document in our database with our Animal model: Mongoose makes this simple with its find method:
Animal.find()
  .sort({ date: -1 })
  .then((items) => console.log(items));
find returns a promise which we can then put in order, using the sort method. Here, -1 is used to order the items by when they were created, with the most recent at the top.
Typing node server into the terminal should reveal an array of objects in your database.
Notice that every item has automatically been given an _id property. Next, we’ll find out how to update an item, so copy the _id of your red panda entry.
Update
If we hear good news that red pandas are no longer endangered, we’ll need to update our database using the findOneAndUpdate method.
This takes two arguments. The first contains our query — the information used to find our entry. The second contains the update — whatever fields we want to change. To mark our red panda as no longer endangered, make sure to pass in your specific _id to the code below:
Animal.findOneAndUpdate(
  { _id: "5d14cd34e8dbe65a6417915b" },
  { isEndangered: false }
).then((item) => console.log(item));
Running node server should return the entry, with isEndangered now set to false.
Delete
We only need to modify our code slightly to delete the entry altogether:
Animal.findOneAndDelete(
  { _id: "5d14cd34e8dbe65a6417915b" },
  { isEndangered: false }
).then(console.log("Item deleted"));
If you run node server and then use the find method as above, you should no longer see the red panda entry in your database. You now know the most essential methods for Mongoose and MongoDB!
Part 4: Expose API Endpoints
Using the node command is helpful for testing, but it’s not practical for a real application: chances are, we’ll want to allow access to these commands by exposing API endpoints. If that doesn’t mean much to you, it should make more sense in the following example.
We’ll now be running a server continuously, so let’s install nodemon so that the server automatically updates every time we save. This can be installed as a development dependency with the -D flag:
npm i nodemon -D
Next, let’s go back to our original server.js code:
const express = require("express");
const mongoose = require("mongoose");
const path = require("path");
const config = require("config");

const app = express();

const db = config.get("mongoURI");

mongoose
  .connect(db, {
    useNewUrlParser: true,
    useCreateIndex: true,
    useFindAndModify: false,
  })
  .then(() => console.log("MongoDB Connected..."))
  .catch((err) => console.log(err));
A Simple Server
At the bottom, we’ll start a simple server on port 5000:
const port = 5000;

app.listen(port, () =>
  console.log(`Server started on port: http://localhost:${port}`)
);
Run nodemon server, and you should now see a message (Cannot get /) when you open up localhost:5000 in your browser.
Make localhost:5000 display the contents of our database is simple. We can use the same method as above, and just put as a callback inside app.get('/'):
const Animal = require("./models/Animal");
app.get("/", (req, res) => {
  Animal.find()
    .sort({ date: -1 })
    .then((items) => console.log(res.json(items)));
});
Testing endpoints to add, delete and update entries is not quite as simple, but it can be made pretty painless by using Postman.
Testing Endpoints with Postman
First, in order to read the body of our POST, DELETE and UPDATE requests, we’ll need to use express.json(), the body-parsing middleware that’s built into Express.
app.use(express.json());
The following code enables POST requests to be made to localhost:5000, which will then trigger the creation of a new item in our database. But how do we test this?
Installing Postman gives us an interface to make these requests and see the result.
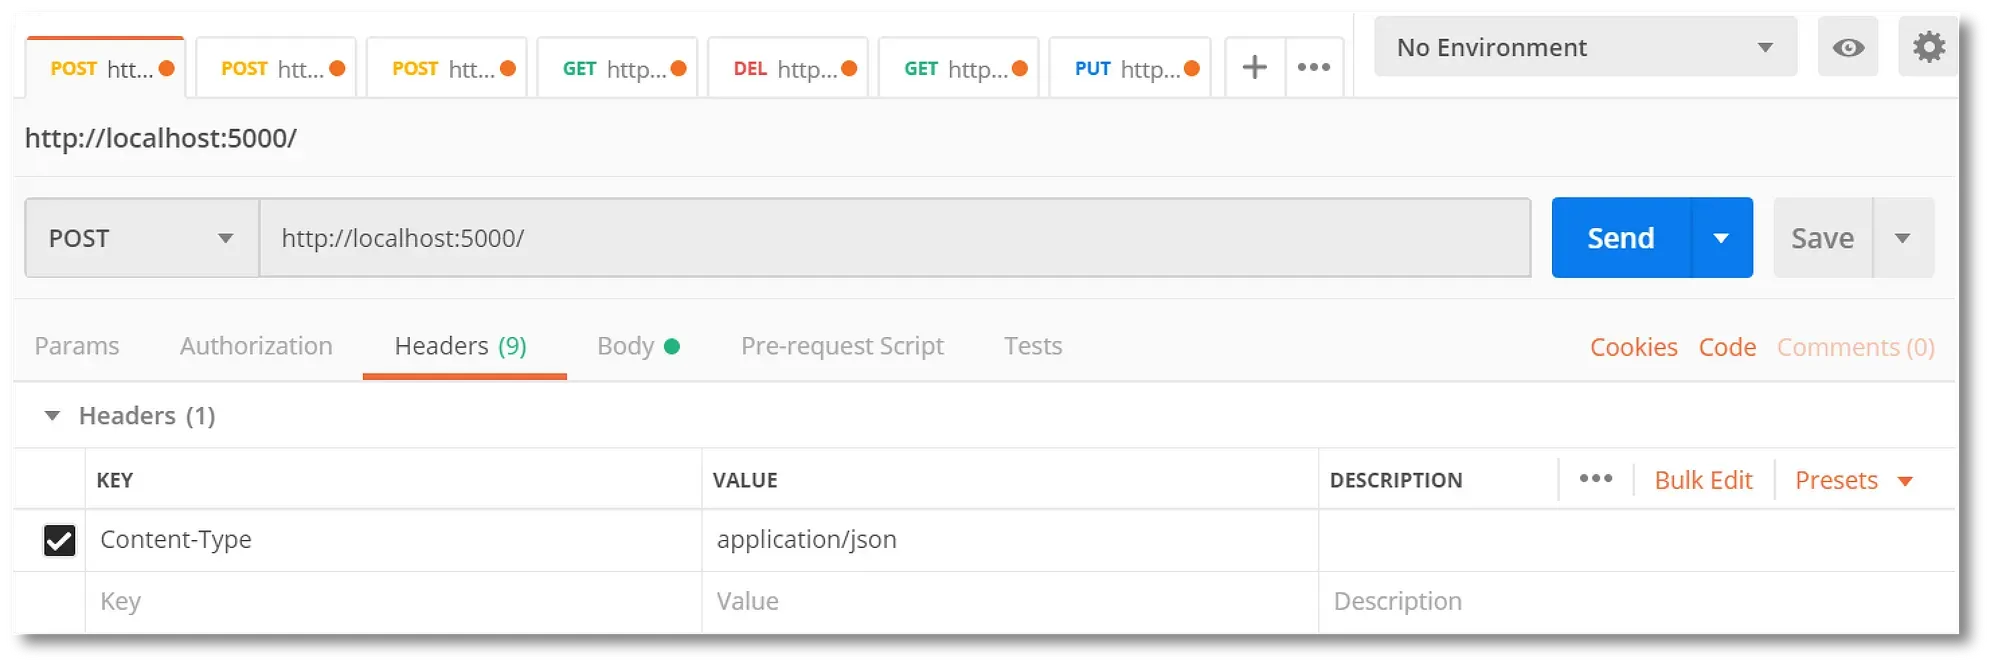
Once Postman is loaded, create a new request. The method should be POST and the URL should be [http://localhost:5000/](http://localhost:5000/).
Under the Headers tab, set the one header with the key Content-Type and the value application/json.
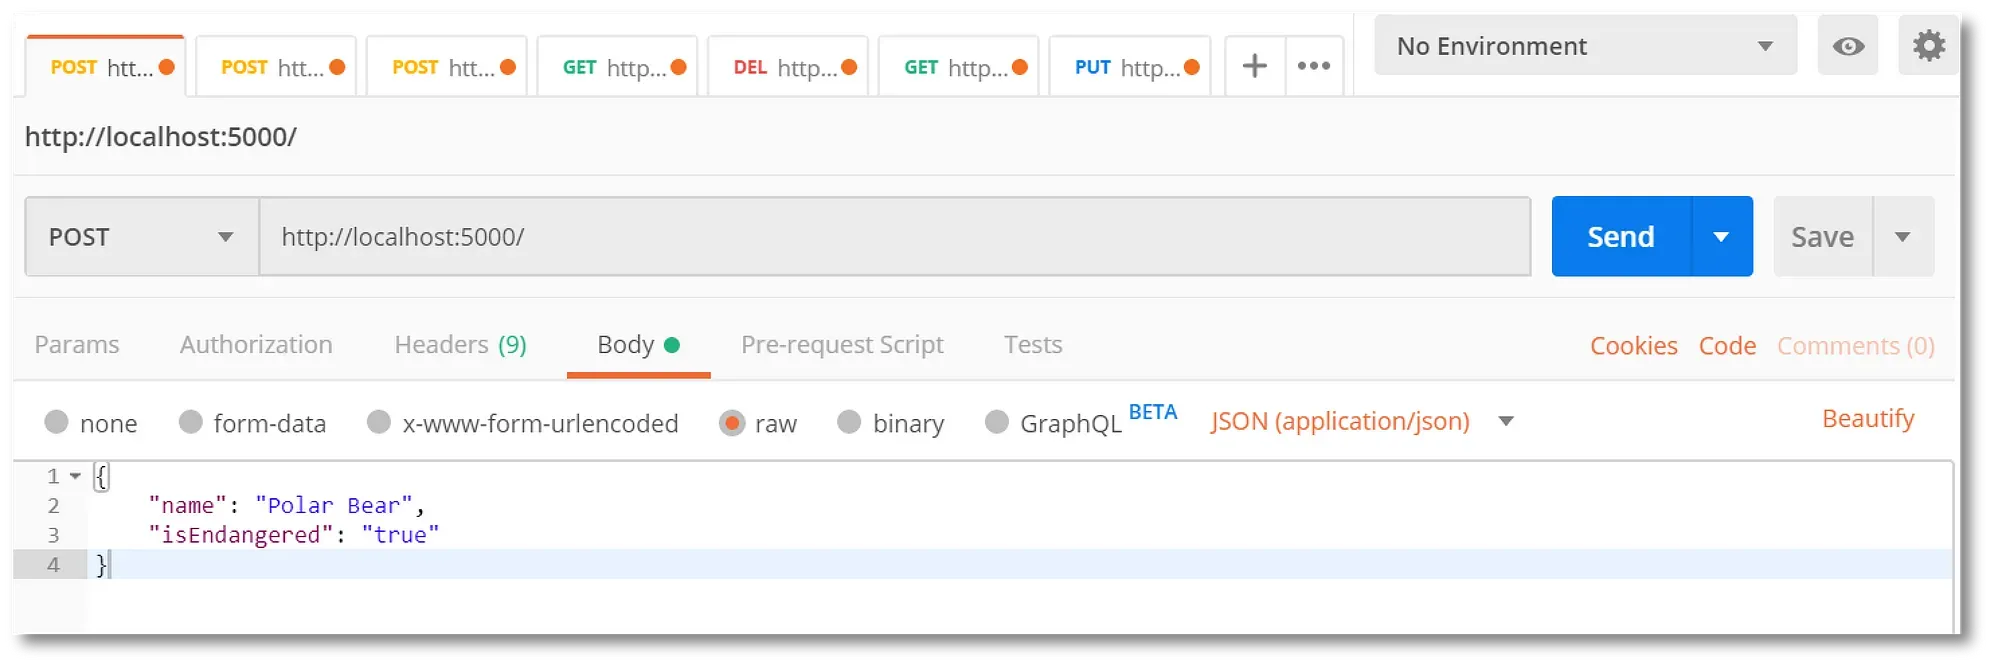
Finally, under the body tab, select raw and enter the new animal as a JSON object:
{
  "name": "Polar Bear",
  "isEndangered": "true"
}
Now, if we make go back to http://localhost:5000/, we’ll see our new entry.
Updating and Deleting
Make API requests to update or delete work in a similar way, except that it’s common practice to put the ID of the item inside the URL. This can be done by adding :id to the path string, as below:
// Delete an entry
app.delete("/:id", (req, res) => {
  Animal.findOneAndDelete({ _id: req.params.id })
    .then(() => res.json({ success: true }))
    .catch((err) => res.status(404).json({ success: false }));
});

// Update an entry
app.put("/:id", (req, res) => {
  Animal.findOneAndUpdate({ _id: req.params.id }, req.body)
    .then(() => res.json({ success: true }))
    .catch((err) => res.status(404).json({ success: false }));
});
You can test these in Postman by passing [http://localhost:5000/yourId](http://localhost:5000/yourId) as the URL and choosing DELETE or PUT, respectively.
If you’ve followed this article to the end, you’ll now have experience of all the essential ingredients to use with MongoDB as part of your back-end.
If you wanted to turn this into a full-stack application, you could use the built-in Fetch API or a node module like axios to grab data from your server and render it — but that’s a topic for a different article!
Related articles
You might also enjoy...

Switching to a New Data Structure with Zero Downtime
A Practical Guide to Schema Migrations using TypeScript and MongoDB
7 min read
Feb 2025
How to Automate Merge Requests with Node.js and Jira
A quick guide to speed up your MR or PR workflow with a simple Node.js script
7 min read
Nov 2024
Automate Your Release Notes with AI
How to save time every week using GitLab, OpenAI, and Node.js
11 min read
Nov 2024
``` ````